An AI chatbot can answer your customers' questions while you sleep, serve customers, or run the business. Adding one used to mean hiring a developer and writing hundreds of scripted answers. Today, a good AI chatbot learns from the website you already have, and you can install it yourself in an afternoon.
This guide walks you through the whole process, from choosing a tool to improving it after launch. It works whether your site runs on WordPress, Shopify, Wix, Squarespace, Webflow or something else.
What you need before you start
You don't need technical skills, but you do need three things:
- A website with useful content. Your services, prices, opening hours, policies and FAQs. The chatbot answers from this, so the better your website, the better the answers.
- Access to your website's settings. You'll paste one line of code into your site. If someone else manages your website, you can send it to them.
- About an hour. Most of that time goes into testing, not setup.
Step 1: Choose the right AI chatbot
Many tools call themselves AI chatbots, but they work very differently. For a small business, look for these five things:
- It learns from your own content. You should be able to paste your website address and have it read your pages, not write every answer by hand.
- It only answers from what's true. The chatbot should stick to your content and say when it doesn't know, rather than inventing prices or policies. Tools that show the source of each answer make this easy to check.
- It can hand over to a person. Some questions need you. Look for live chat, or a handoff to WhatsApp, phone or email.
- It speaks your customers' languages. If your customers write in more than one language, the chatbot should reply in theirs.
- The price is predictable. Watch out for per-conversation or per-seat fees that grow quickly. A free plan lets you test properly before you pay.
If you're comparing tools, see the best AI chatbots for small businesses, eight tools compared with real prices and where each one is stronger.
Step 2: Gather your content
Before you create the chatbot, spend ten minutes checking your website. The chatbot can only know what's written down, so look for gaps:
- Are your prices on the site, or at least a "from" price?
- Are your opening hours, location and contact details easy to find?
- Do you have a page for each service or product category?
- Are policies written down: delivery, returns, cancellations, booking rules?
- Do you have an FAQ page? If not, list the ten questions you answer most often. You'll add them in step 4.
If some information isn't on your website, such as an internal price list, keep the file handy. Most chatbot tools let you upload documents too.
Step 3: Create your chatbot and let it learn your site
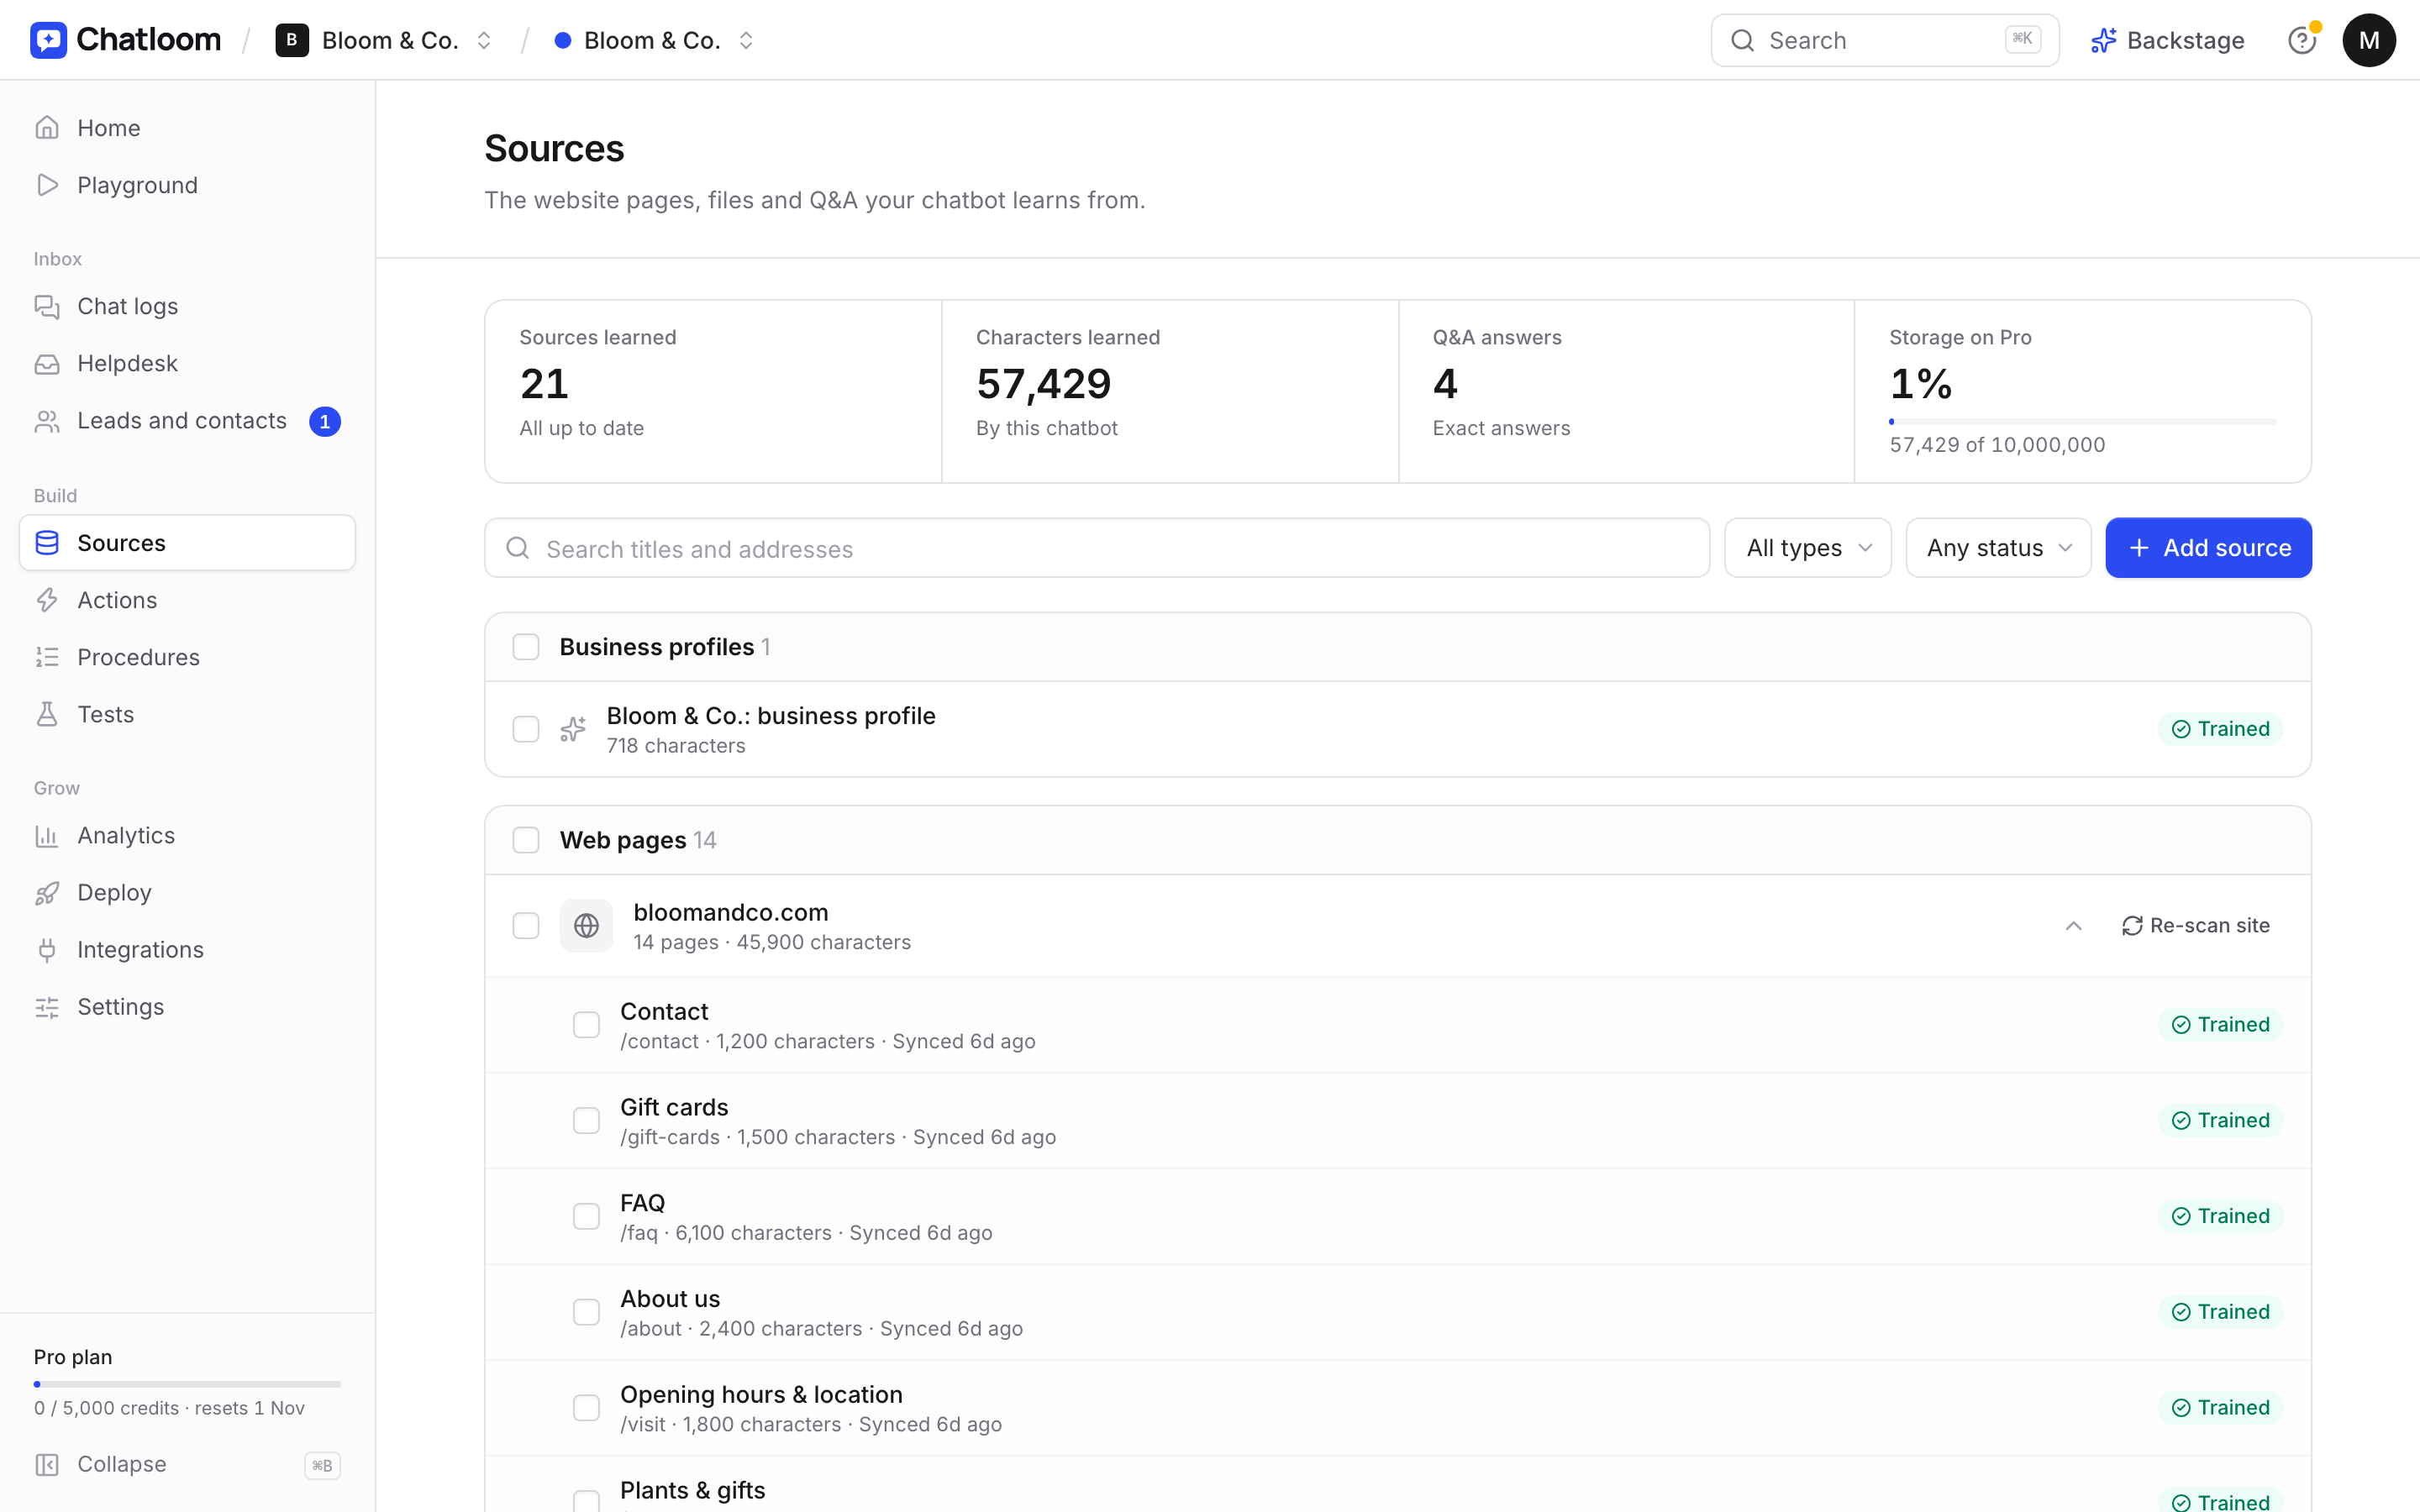
In most modern tools, this is the easy part. In Chatloom, for example, you paste your website address and it reads your pages, then builds a short profile of your business: what you do, your services, prices and policies. You check the profile, fix anything it got wrong, and choose which pages to keep.
A few tips:
- Leave out pages that would confuse it, like old blog posts about discontinued services or job listings.
- Add files for anything that isn't on your website.
- Set the tone. Tell the chatbot how to speak: friendly and short, formal, or whatever suits your brand.
Step 4: Fill the gaps with questions and answers
Your website won't cover everything. Write short questions and answers for the things customers ask that aren't on your site, such as:
- "Do you have parking?"
- "Can I bring my dog?"
- "Do you offer gift cards?"
These Q&A entries are often the most useful content you'll give your chatbot, because they come straight from real conversations.
Step 5: Test it like a customer
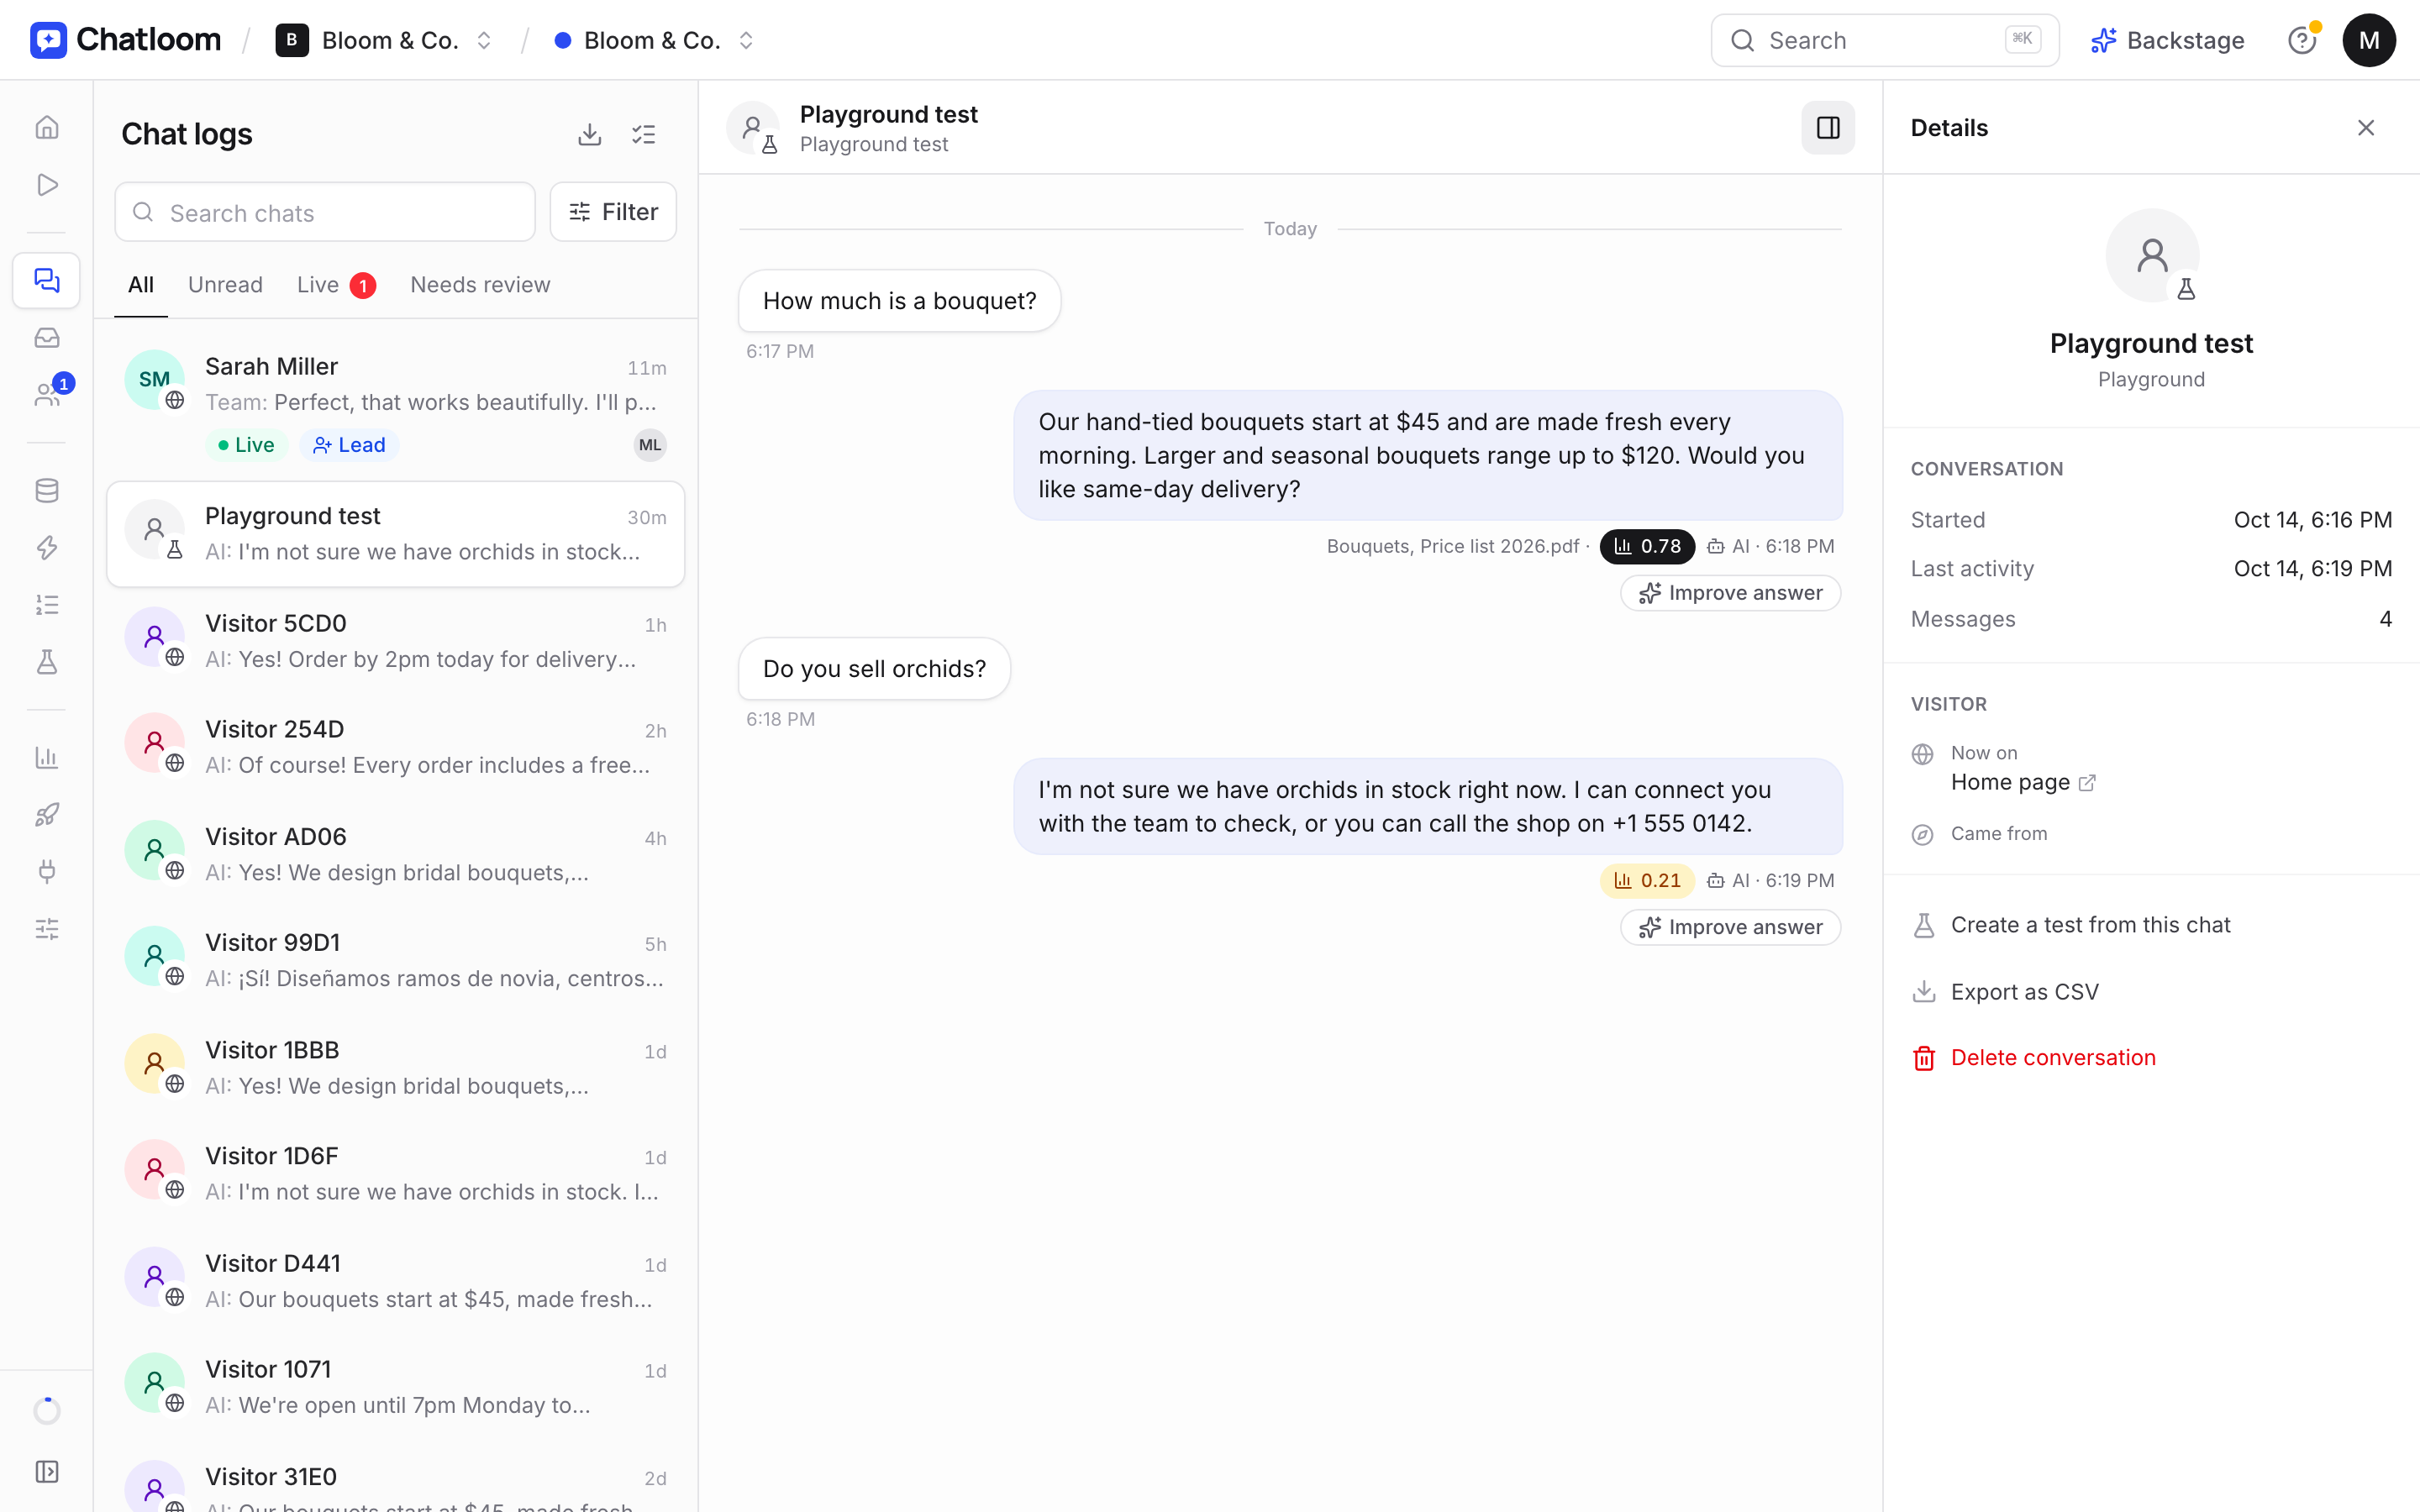
Don't skip this step. Open the chatbot's test area and ask the questions your customers really ask, in their words:
- The ten most common questions you get.
- Questions with a twist: "Are you open on the bank holiday?", "Do you deliver to [nearby town]?"
- Questions it shouldn't answer, to check it says "I'm not sure" instead of guessing.
- A question in another language, if your customers use one.
When an answer is wrong, don't just correct the chatbot. Find why: usually the information is missing or unclear on your website. Fix the page or add a Q&A entry, then test again.
Step 6: Install it on your website
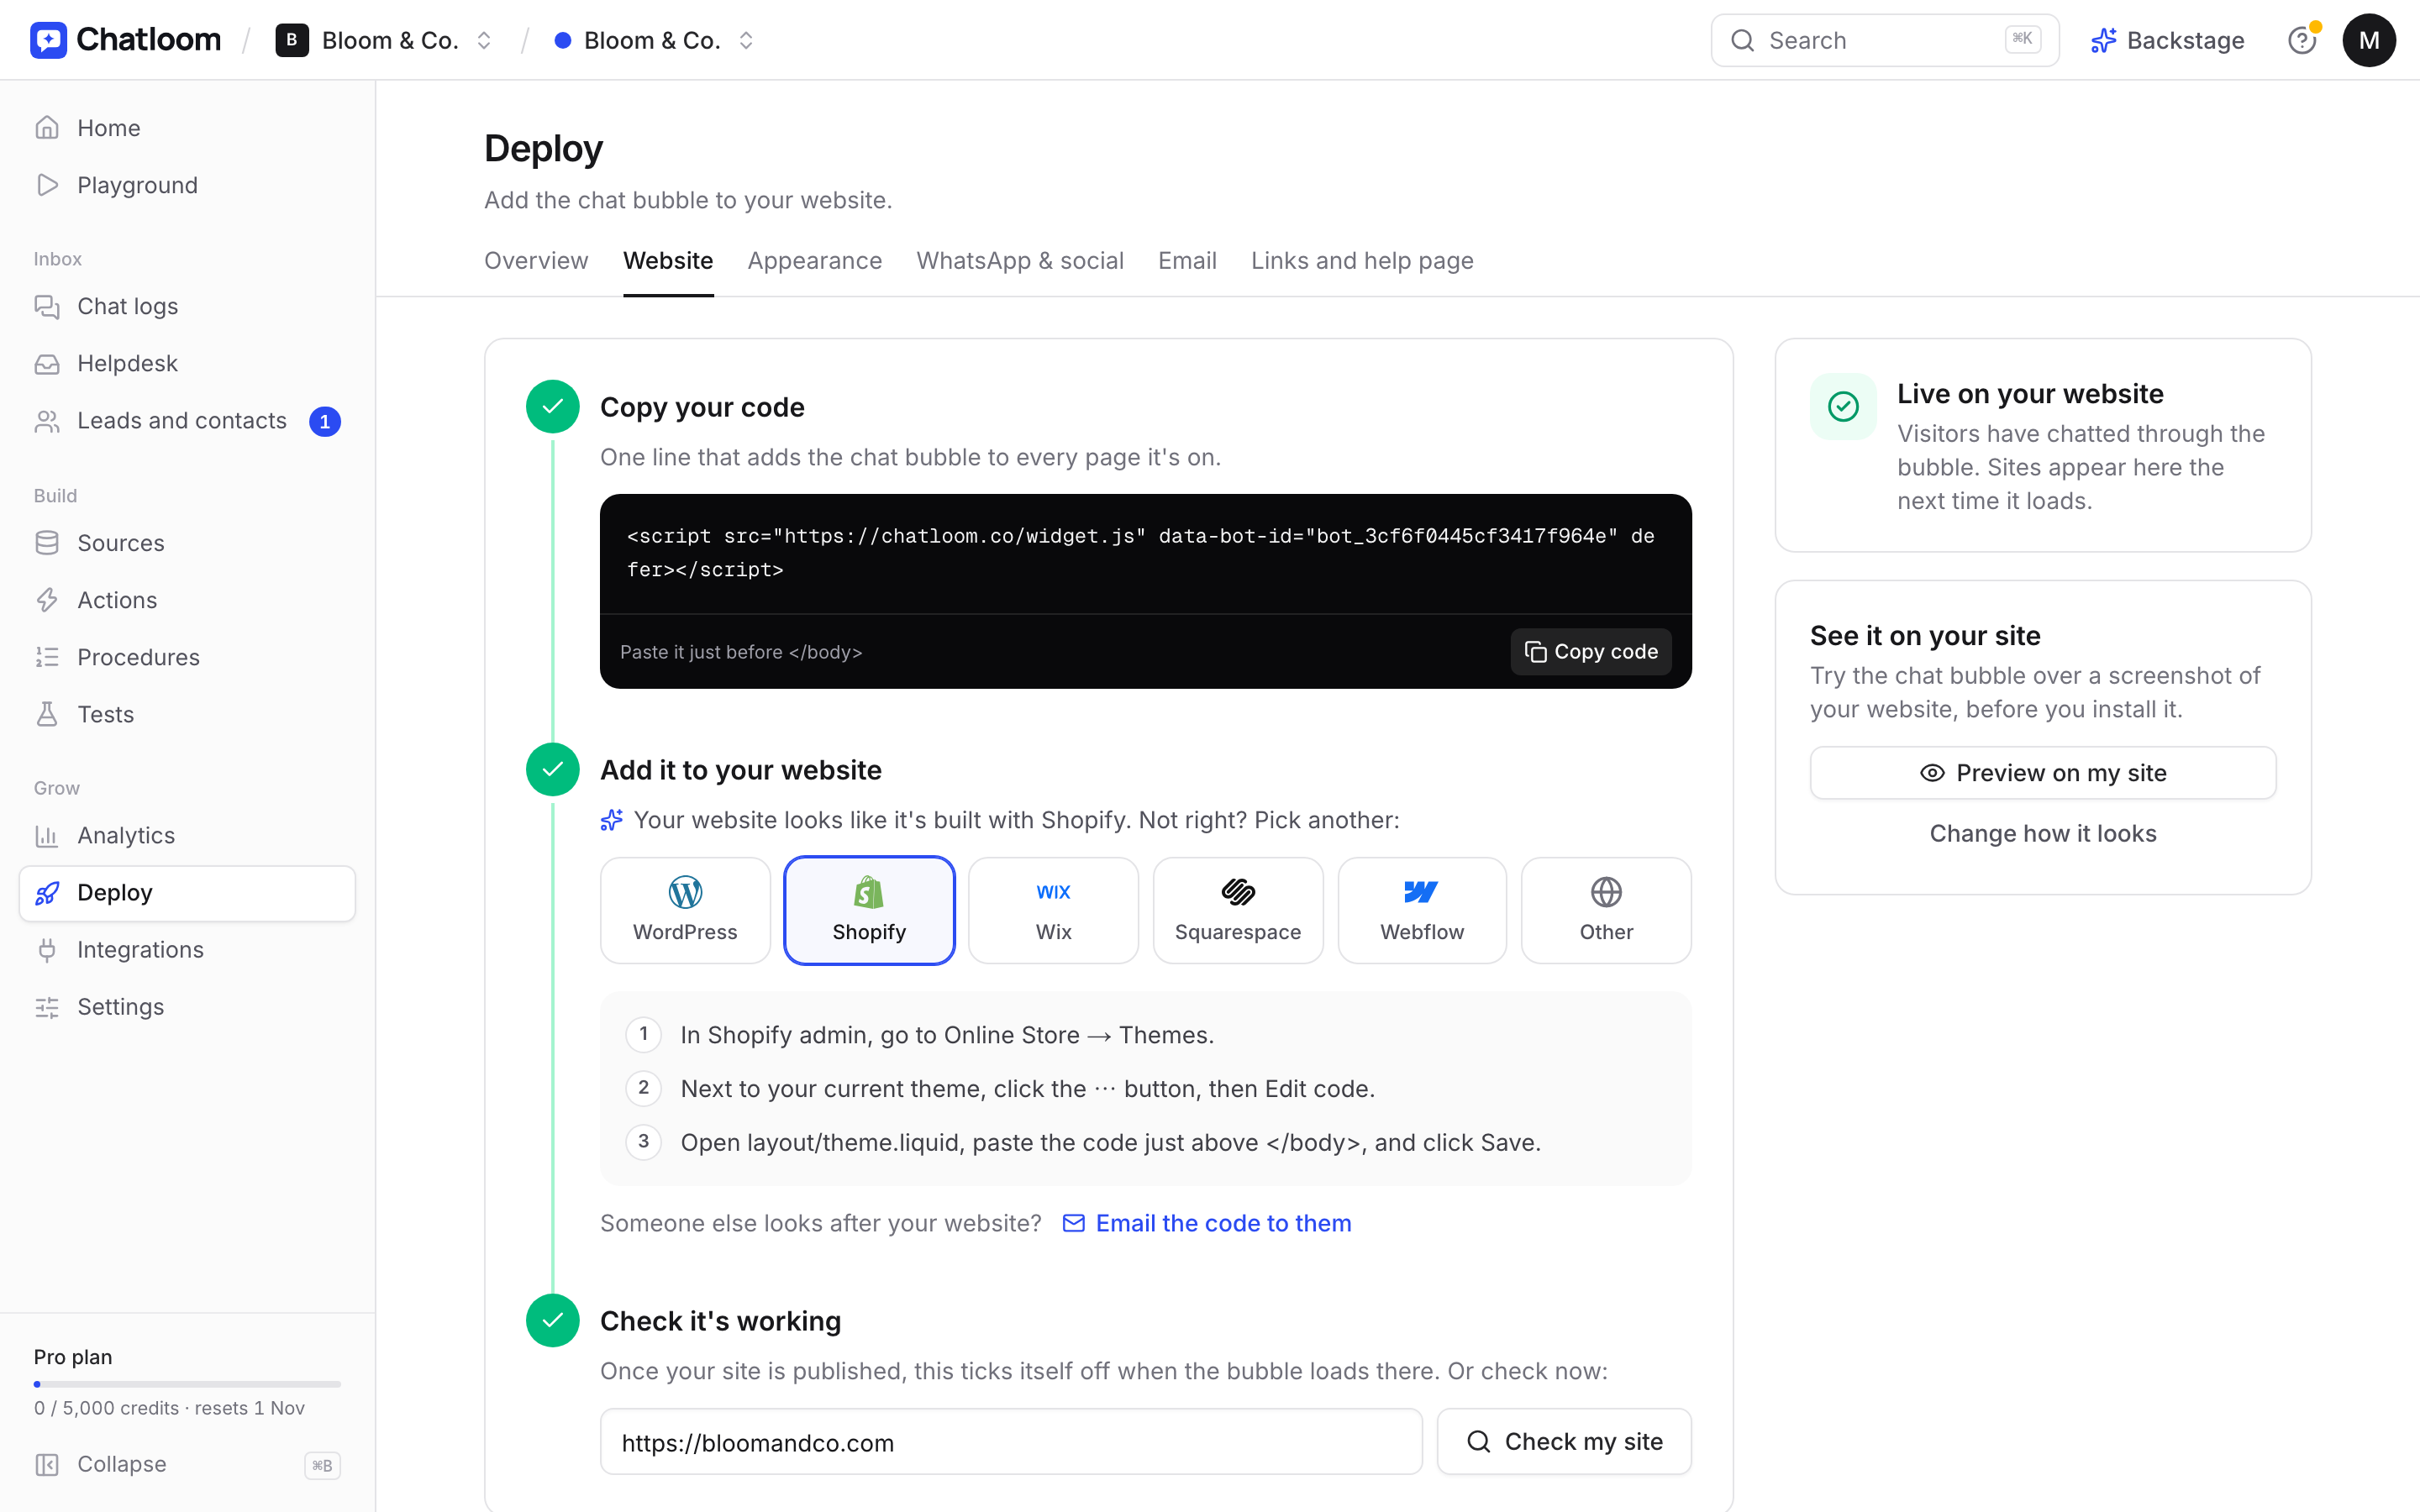
Your chatbot tool gives you a short piece of code. Where you paste it depends on how your website is built:
| Website platform | Where the code goes |
|---|---|
| WordPress | A header and footer plugin such as WPCode, in the footer box |
| Shopify | Your theme's theme.liquid file, just above the closing body tag |
| Wix | Settings → Custom code (premium plans) |
| Squarespace | Settings → Code injection, footer box |
| Webflow | Site settings → Custom code, footer, then publish |
| Anything else | Just before the closing body tag of your pages |
Each link above has the exact steps for that platform. If someone else manages your website, send them the code and these steps.
A well-built chat widget loads after the rest of your page, so it shouldn't slow your site down. Check your site's speed before and after if you're unsure.
Step 7: Set up handoff and alerts
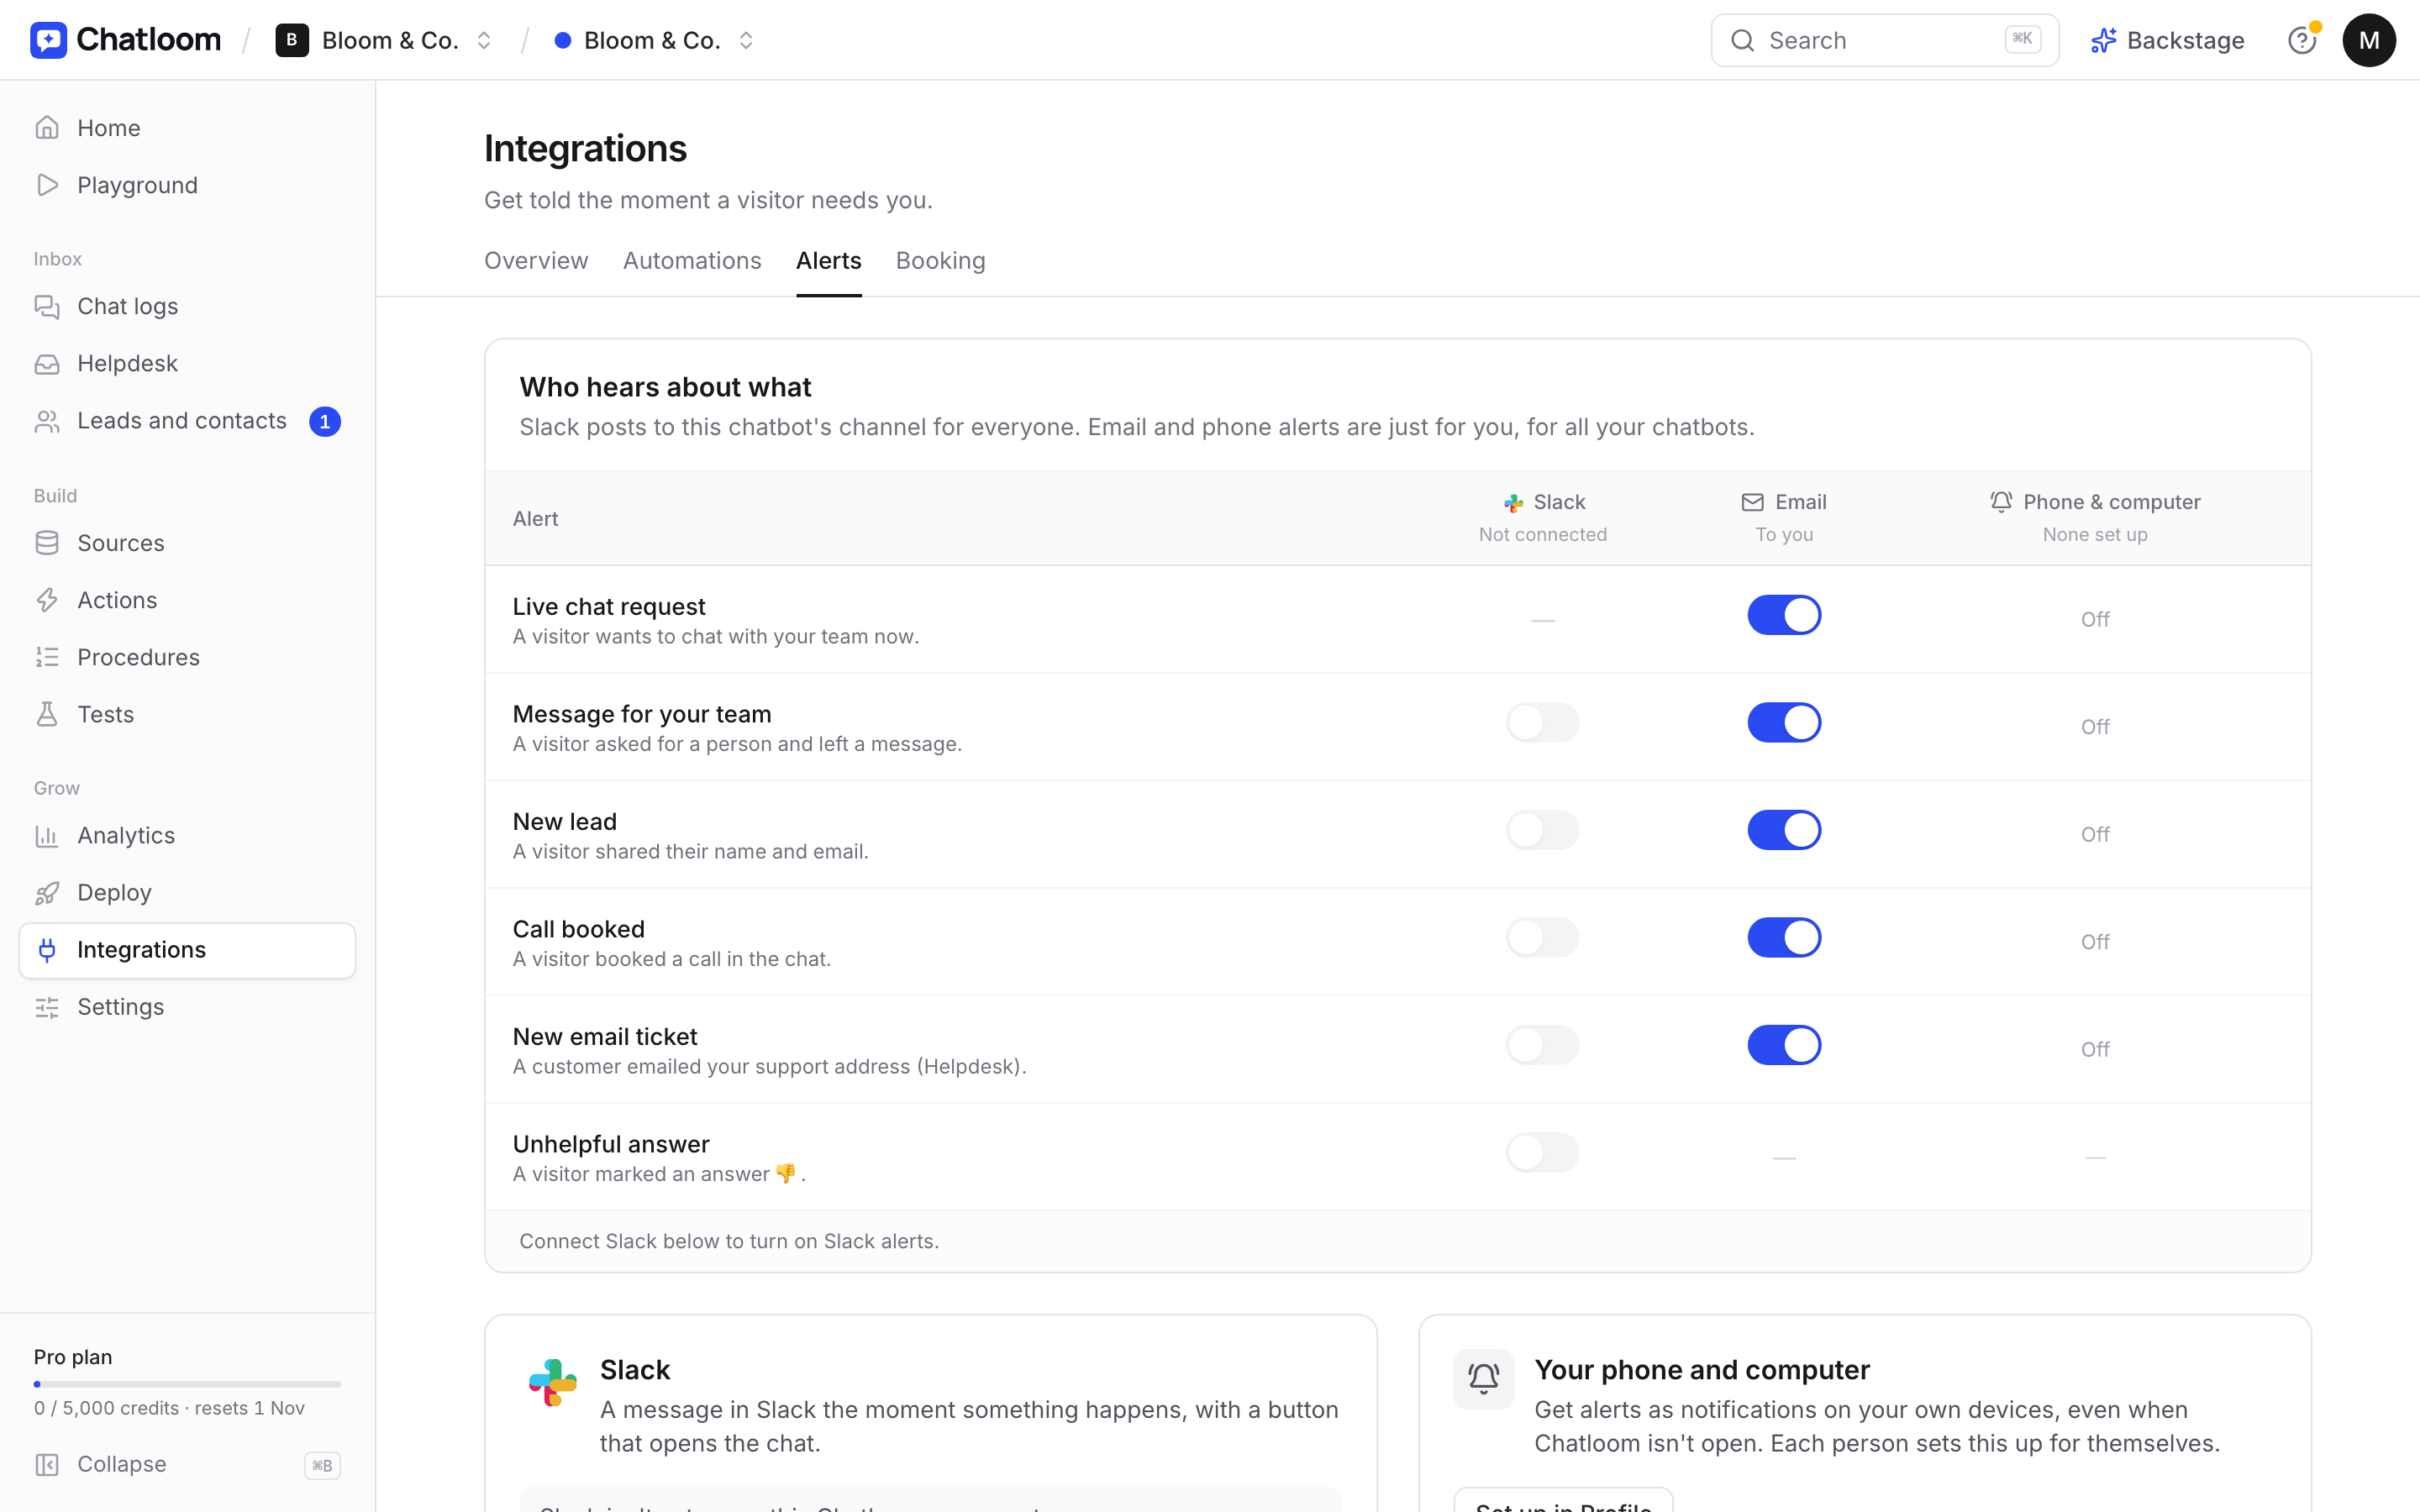
Decide what happens when the chatbot can't help, or a customer wants a person:
- Live chat: you or your team can take over the conversation from your dashboard.
- Handoff to another channel: the customer can reach you on WhatsApp, by phone or by email.
- Alerts: get notified by email, Slack or on your phone when someone asks for a person or leaves their details.
Make sure someone actually receives these alerts. A chatbot that promises "the team will get back to you" only works if the team does.
Step 8: Launch, then improve every week
Your chatbot gets better the more you look after it. Once a week, spend ten minutes on three things:
- Read the questions it couldn't answer. Each one is a gap in your content. Add the answer.
- Read a few conversations. Are the answers right? Is the tone right?
- Refresh changed pages. If you updated prices or opening hours on your website, make sure the chatbot has the new version.
After a few weeks, most of your common questions will be answered well, and you'll have learned a lot about what your customers want to know.
Common mistakes to avoid
- Launching without testing. Customers will find the gaps for you, in public.
- Hiding prices. If your website says nothing about price, the chatbot can't either, and price is usually the first question.
- No way to reach a person. Frustrated customers leave. Always offer a human option.
- Forgetting to update it. Old prices and hours are worse than no answer.
Your checklist
- Website has prices, hours, location, services and policies
- Chatbot created and trained on your website
- Files and Q&A added for anything missing
- Tested with your ten most common questions
- Code installed on every page of your site
- Handoff and alerts set up, and someone receives them
- Weekly ten-minute review in your calendar
If you'd like to try this with Chatloom, the free plan is enough to set up and test a chatbot on your own website.
Questions
How long does it take to add an AI chatbot to a website?
Setup itself takes a few minutes: paste your website address, check what the chatbot learned, and paste one line of code into your site. Plan about an hour in total, mostly for testing it with your real customer questions.
Do I need to know how to code?
No. You paste one line of code into your website's settings, and most website builders have a box for it. If someone else manages your site, you can send them the code.
Will an AI chatbot give wrong answers?
A good one answers only from your content and says when it isn't sure. Test it before launch, and check the questions it couldn't answer each week to fill the gaps.